목차
- 인트로 (완성앱 & 구현 기능 소개)
- Linearlayout 이용하여 화면 그리기
- 화면을 이쁘게 꾸며보기
- 키와 몸무게 입력 화면 기능 구현하기 (1)
- 키와 몸무게 입력 화면 기능 구현하기 (2)
- 결과화면 기능 구현하기
- 아웃트로 (정리)


이 챕터를 통해 배우는 것
- Layout 을 그리는 법
- LinearLayout 사용하기
- TextView 의 속성들과 사용하는 법
- EditText 의 속성들과 사용하는 법
- Button 사용하는 법
- Layout 과 Kotlin 코드를 함께 사용하기
- 버그 수정해보기
- Activity 에 대해 알아보기
Kotlin 문법
when 분기문
람다함수
BMI 계산하기
공식 = 몸무게(kg) / (키 (m) * 키 (m))
18.5 이하면 저체중
18.5 ~ 23 은 정상체중
23 ~ 25는 과체중
25 ~ 30 은 경도 비만
30 ~ 35 는 중정도비만
35 이상은 고도 비만
- LinearLayout 사용하기
    <LinearLayout
        android:layout_width="match_parent"
        android:layout_height="wrap_content"
        android:gravity="center"
        android:orientation="horizontal"
        android:padding="30dp">

        <TextView
            android:layout_width="wrap_content"
            android:layout_height="wrap_content"
            android:text="BMI : "
            android:textColor="@color/custom_black"
            android:textSize="30dp"></TextView>

        <TextView
            android:id="@+id/bmiResultTextView"
            android:layout_width="wrap_content"
            android:layout_height="wrap_content"
            android:text=""
            android:textColor="@color/custom_black"
            android:textSize="30dp"
            tools:text="23.1111"></TextView>

    </LinearLayout>
- 리니어 레이아웃은 평행한 레이아웃을 표현가능하다.
여기서 layout의 width와 height는 wrap_content와 match_parent를 선택 가능한데 무슨 차이일까 ?
wrap_content / match_parent 차이는 간단하다.
wrap_content는 폭과 높이가 글자가 꼭 들어갈 정도로 설정되고,
match_parent는 자신의 부모에 폭이나 높이를 맞추는 것 이다.
긴 말 필요 없이 예시를 보면 이해가 빠르게 된다.
1 - wrap_content + wrap_content
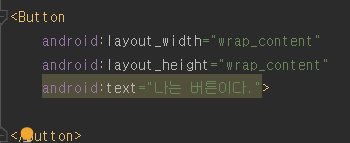
wrap_content + wrap_content는 이렇게 글자 크기에 맞게 감싸진다.
2 - wrap_content + match_parent

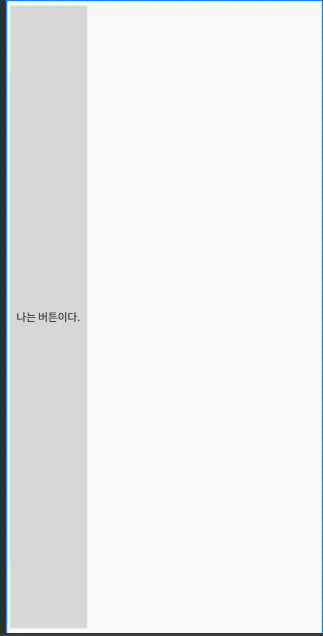
wrap_content + match_parent는 이렇게 가로는 글자 크기에 맞게 세로는 부모 레이아웃에 맞춰진다.
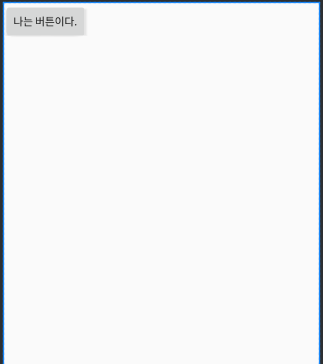
3 - match_parent + wrap_content

match_parent + wrap_content는 세로는 글자 크기에 맞게 가로는 부모 레이아웃에 맞춰진다.
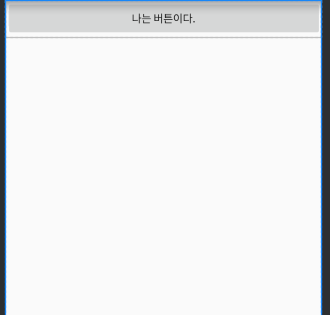
4 - match_parent + match_parent


match_parent + match_parent는 이렇게 가로 세로 모두 부모 레이아웃에 맞춰진다.
- TextView / EdithText 의 속성들과 사용하는 법
TextView 같은 경우는 LinearLayout 내에 위치 시켜 줄 수 있다. 그리고 MainActivity에서 호출을 하기 위해서는
val weightEditText = findViewById<EditText>(R.id.weightEditText)
findviewbyId를 통해 TextView, EditText등을 가지고 올 수 있다.
- Button 사용하는 법
resultButton.setOnClickListener{
setOnclickListener를 통해 클릭할 때 ~~! 의 결과물을 알 수있도록 코드 작성해준다.
if (heightEditText.text.isEmpty() || weightEditText.text.isEmpty()){
    Toast.makeText(this, "빈 값이 있습니다.", Toast.LENGTH_SHORT).show()
    return@setOnClickListener
}
여기서는 키의 값이 빈값이거나 몸무게값이 빈값이면 빈 값이 있습니다 라는 토스트 메시지를 만들어 주어야 한다.
- Intent 사용하는 법
Intent는 현재의 Acitivity에서 다음 Activity로 넘어가기위한 방법으로 아주 중요하다
val intent = Intent(this, ResultActivity::class.java)
// 핵심기능 Intent !! 현재 위치에서 java클래스로 이동할 수있도록 하는 기능

intent.putExtra("height", height) // 인텐트에 Extra 집어 넣어준다. putExtra!
intent.putExtra("weight", weight)

startActivity(intent) // 순서 val intent = Intent(this, ResultActivity::class.java), PutExtra, startActivity()
this부분에서 다음 넘어갈 Activity부분으로 Intent 설정을 해준다. Intent에 putExtra를 넣어주어 몸무게와 키값을 넘겨 준다, 이때 intent에 putExtra 해주는 경우 getExtra할때 팔요한 키값 즉 Id 값을 string으로 설정해주어 넘겨주어야 한다. 여기서는 height와 weight를 넘겨 주었다.
이렇게 ResultAcitiy로 넘겨준 결과 값을
val height = intent.getIntExtra("height", 0) // put한 것을 name을 통해 가져올수 있다.
val weight = intent.getIntExtra("weight",0)
getIntExtra형태로 받아 줄 수 있다.
- when문 사용법
val resultText = when { // when Expression
    bmi >= 35.0 -> "고도 비만"
    bmi >= 30.0 -> "중등도 비만"
    bmi >= 25.0 -> "경도 비만"
    bmi >= 23.0 -> "과체즁"
    bmi >= 18.5 -> "정상 체중"
    else -> "저체중"
}
when을 통해 switch문과 같이 알맞은 조건으로 출력이 되도록 resultText를 구현해준다.
그러면 최종 적으로
var bmi = weight / (height / 100.0).pow(2.0)
bmi = round (bmi * 1000 / 1000)

val resultValueTextView = findViewById<TextView>(R.id.bmiResultTextView)
val resultStringTextView = findViewById<TextView>(R.id.resultTextView)

resultValueTextView.text = bmi.toString()
resultStringTextView.text = resultText
bmi 계산을 하여 resultTextView에 값을 넣어주어 확인 할 수 있다.
'안드로이드 > 앱개발(Android)' 카테고리의 다른 글
| (코틀린 kotlin) 타이머 앱 (0) | 2022.01.22 |
|---|---|
| (코틀린 kotlin) 전자액자 앱 (0) | 2022.01.21 |
| (코틀린 kotlin) 계산기 앱 (0) | 2022.01.21 |
| (코틀린 kotlin) 비밀 다이어리 앱 (0) | 2022.01.17 |
| (코틀린 kotlin) 로또번호생성기 앱 (0) | 2021.12.26 |